فروردین 28, 1403 10:17 ق.ظ

ایران سرویس

خیابان بهبودی، نرسیده به نصرت، جنب بانک سپه، پلاک 145،ساختمان بنیامین،طبقه 5 واحد 18
دفتر مرکزی: 66097851  مرکز تعمیرات: 66097859  شعبه شرق: 77978135  شعبه هفت تیر: 88836102  شعبه جنوب: 55300568   شعبه غرب: 44153186   شعبه شمال 26721443   شعبه اسلامشهر و رباط کریم: 56746602

 تعویض فن Satellite A215 S4697 توشیبا
تعویض فن Satellite A215 S4697 توشیبا

مرحله 1 تعویض فن – باتری

در اولین مرحله از تعویض فن لپ تاپ:

  • ابتدا لپ تاپ را ببندید و آن را بچرخانید به طوریکه پایه آن روبه بالا قرار گرفته و پشت آن در مقابل شما باشد.
  • محفظه باتری را پیدا کنید.
  • اسلایدر چپ واقع در زیر محفظه باتری را به سمت چپ حرکت دهید.

Close the laptop and turn it over so that the base is facing upwards and the spine is facing away from you.Find the battery compartment.Slide the left slider which is just beneath the battery compartment into its leftmost position.

مرحله 2

  • اسلایدر راست را به سمت راست خود حرکت داده و نگهدارید. باتری را از محفظه بلند کنید.
  • برآمدگی های طلایی داخل محفظه را لمس نکنید.

Slide and hold the right slider into its rightmost position. Lift the battery out of the compartment.Do not touch the gold nodes inside the compartment.Do not touch the gold nodes inside the compartment.

مرحله 3- کیبورد

  • لپ تاپ را در سطح صاف و تمیز قرار دهید و آن را باز کنید.
  • نوار بالای کیبورد و شکاف های پشت کلیدهای f1، F8 و Insert را پیدا کنید.
  • ابزار بازکننده پلاستیکی را در این شکاف ها وارد کرده و نوار را به بالا بکشید تا برداشته شود.

Place laptop right side up on a flat and clean surface. Open the laptop.Find the strip just above the keyboard and locate the gaps behind the F1, F8, and Insert keys.Remove the strip by sticking your plastic opening tool into these gaps in order, and pulling up.

مرحله 4

  • دو پیچ 2.3 میلیمتری فیلیپس #1 واقع در بالای کیبورد را مشخص کنید که کیبورد را به فریم پشت آن متصل کرده است.
  • پیچ ها را بردارید.

Locate the two 2.3mm Phillips #1 screws at the top of the keyboard that attaches the keyboard to the frame behind it.Remove screws.

مرحله 5

  • چفت بالای کلید F8 را پیدا نموده که روی کیبورد پوشانده شده است.

با استفاده از ابزار بازکننده پلاستیکی، دکمه برد کلیدی را فشار داده تا اینکه برد کلید آزاد شود.

Find the latch above the F8 key that overlaps the keyboard.Use a plastic opening tool to press the key board's tab downward, until the key board is released.Use a plastic opening tool to press the key board's tab downward, until the key board is released.

مرحله 6

  • کیبورد را تغییر آن به سمت صفحه بکشید و بلند کنید.
  • هشدار: این قطعه را زیاد نکشید زیرا با یک کابل به لپ تاپ متصل شده است.
بخوانید  تعویض CPU Tecra M5 توشیبا

Pull the keyboard out by shifting it forward towards the screen and pulling up.CAUTION: Do not pull it out all the way yet. It is still attached to the laptop by a cable.

مرحله 7

  • کابل نواری متصل کننده کیبورد به لپ تاپ را پیدا کنید. به دکمه های مشکی دو طرف کابل دقت کنید.
  • با استفاده از موچین، دکمه های مشکی دو طرف کانکتور کابل را به سمت صفحه بکشید تا اینکه کابل بتواند به آسانی بیرون کشیده شود.
  • کابل را بیرون کشیده و کاملا از کیبورد بردارید.

Find the ribbon cable that connects the keyboard to the laptop. Look for the black tabs on both sides of cable at the laptop end of the cable.Using a pair of tweezers, pull the black tabs on both sides of the cable connector towards the screen until the cable can be pulled out easily.Pull out the cable and completely remove the keyboard.

مرحله 8- درایو نوری

  • کامپیوتر را بچرخانید به طوریکه محفظه باتری روبه بالا باشد.
  • یک پیچ فیلیپس #1 واقع در مرکز را باز کنید.

این پیچ نمی تواند کاملا از دستگاه برداشته شود.

Turn computer over so that the battery compartment is facing up and is at the top.Locate and unscrew one captive Phillips #1 screw located at the center.A captive screw cannot be completely removed from the device's component.

مرحله 9

  • با استفاده از ابزار بازکننده پلاستیکی، کاور دسترسی مادربرد را باز کنید.

مادربرد را لمس نکنید.

Use a plastic opening tool to open the motherboard access cover.Do not touch the motherboard.Do not touch the motherboard.

مرحله 10

  • یک پیچ 1.5 میلیمتری فیلیپس #1 واقع در نزدیک لبه چپ بالای دهانه را بردارید.

Remove one 1.5mm Phillips #1 screw located near the top left edge of the opening.Remove one 1.5mm Phillips #1 screw located near the top left edge of the opening.Remove one 1.5mm Phillips #1 screw located near the top left edge of the opening.

مرحله 11

  • دستگاه را به سمت راست بچرخانید تا اینکه درایو نوری مقابل شما قرار بگیرد.
  • گیره کاغذ را در سوئیچ آزادکننده دستی واقع در سمت راست دکمه آزادسازی خودکار وارد کنید.

درایو نوری آزاد نمی شود اگر که گیره به صورت مورب وارد شود. اطمینان حاصل کنید که گیره مستقیم به سوئیچ وارد شود.

Flip your device right side up, and rotate it so that the optical drive is facing you.Insert a paper clip into a manual release switch located to the right of the automatic release button.

مرحله 12

  • درایو نوری را به آرامی بکشید تا اینکه کیس فلزی درایو نوری دیده شود.
  • کیس فلزی را نگهدارید و همچنان درایو را به سمت خود بکشید.

Gently pull out the disk drive until you can see the metallic case of the optical drive.Hold the metal case and continue to pull the drive out toward you.

مرحله 13

پس از مشاهده لیبل های زرد در درایو نوری، پایه دیسک را کاملا عقب بکشید تا صدایی شنیده شود.
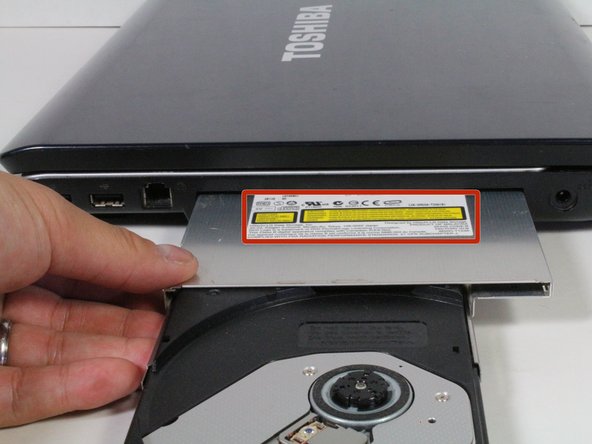
بخوانید  تعمیر/ تمیز کردن سیستم فن خنک کننده لپ تاپ توشیبا مدل Satellite C850

Once you see the yellow labels on the disk drive, fully retract the disk mount until you hear a click.Once you see the yellow labels on the disk drive, fully retract the disk mount until you hear a click.Once you see the yellow labels on the disk drive, fully retract the disk mount until you hear a click.

مرحله 14

  • درایو نوری را همچنان به سمت خود بکشید تا اینکه کاملا از محفظه لپ تاپ برداشته شود.

Continue to pull the disk drive toward you until it is completely removed from the laptop's housing.Continue to pull the disk drive toward you until it is completely removed from the laptop's housing.Continue to pull the disk drive toward you until it is completely removed from the laptop's housing.

مرحله 15- فن

  • درب دستگاه را ببندید و لپ تاپ را بچرخانید به طوریکه قسمت پایین مقابل شما قرار بگیرد.
  • 19 پیچ 8 میلیمتری فیلیپس #1 با علامت F8 را بردارید.
  • دو پیچ f4 را نیز بردارید.

Close the lid and flip the laptop over so that the bottom side is facing you.Remove nineteen 8mm Phillips #1 screws, labeled with "F8."Locate and Remove two "f4" screws as well.

مرحله 16

  • محفظه رم را مشخص کنید.
  • 2 پیچ فیلیپس #1 را باز کنید و درب را بلند کنید.

توجه کنید که این دو پیچ از درب جدا نمی شوند.

Locate the RAM compartment.Unscrew the two Phillips #1 screws and lift the lid up.Note that these two screws do not detach from lid.

مرحله 17

  • 2 پیچ 8 میلیمتری فیلیپس #1 داخل محفظه رم را بردارید.

Unscrew the two 8mm Phillips #1 screws inside the RAM compartment.

مرحله 18

  • 3 پیچ 8 میلیمتری فیلیپس #1 داخل محفظه باتری را بردارید.

Remove the three 3mm Phillips #1 screws inside the battery compartment.Remove the three 3mm Phillips #1 screws inside the battery compartment.

مرحله 19

  • کامپیوتر را چرخانده و درب آن را باز کنید.

مطمئن شوید که تمام پیچ ها قبل از وارونه شدن کامل دستگاه، از دستگاه خارج شده باشند.

  • 4 پیچ 8 میلیمتری فیلیپس #1 واقع در شیار را که کیبورد قرار گرفته است بردارید.

Turn computer over and open lid.Make sure all the screws are cleared off the device before you flip the device over.

مرحله 20

  • کابل های اسپیکر نزدیک گوشه راست و بالا را مشخص کنید.
  • این کابل را با موچین به دقت قطع کنید.

Locate the speaker cables near the top right corner.Use tweezers to carefully disconnect the cable.Use tweezers to carefully disconnect the cable.

مرحله 21

  • کابل روی گوشه چپ و پایین شیار کیبورد را مشخص کنید.
  • این کابل را به آرامی به سمت چپ بکشید.

Locate the cable on the bottom left hand corner of keyboard slot.Gently pull it out to the left.

مرحله 22

  • کابل واقع در بالای فریم را مشخص کنید.
  • با استفاده از موچین، دکمه های هر طرف را به سمت صفحه بکشید و کابل را از سوکت بیرون بکشید.
بخوانید  تعویض صفحه LCD Chromebook 2 توشیبا

Locate the cable at the top of the frame.Using tweezers, pull tabs on either side, toward the screen, and pull the cable out of socket.

مرحله 23

  • دیگر کابل نواری را در مرکز پایین شیار کیبورد را مشخص کنید.
  • با استفاده از موچین، دکمه ها را به سمت چپ بکشید و کابل را از سوکت بیرون بکشید.

Locate another ribbon cable at the lower center of the keyboard slot.Using tweezers, pull tabs out to the left, and pull cable out of socket.Using tweezers, pull tabs out to the left, and pull cable out of socket.

مرحله 24

  • ابزار بازکننده پلاستیکی را در اطراف لپ تاپ حرکت داده و فریم نقره ای را از قسمت پایین مشکی جدا کنید.

حاشیه مشکی در جلوی لپ تاپ بخشی از فریم نقره ای بالا می باشد.

  • فریم را از لپ تاپ بلند کنید.

Using a plastic opening tool, insert into slit around laptop and separate the silver frame from black bottom.The black lip on the front of the laptop is part of the top silver frame.Lift frame away from laptop.

مرحله 25

  • فن واقع در گوشه چپ و بالا و داخل لپ تاپ را مشخص کنید.
  • پیچ های زیر را از محفظه فن بردارید:
  • 2 پیچ 12 میلیمتری فیلیپس #1
  • 2 پیچ 2.3 میلیمتری فیلیپس #1

Locate the fan in the top left hand corner of the inside of the laptop.

مرحله 26

  • کابل نواری فلت خاکستری را از فن بکشید به طوریکه به سطح فن گیر نکند.
  • کابل را با کشیدن انتهای مشکی آن به سمت چپ قطع کنید به طوریکه از قطعه پلاستیکی سفید جدا شود.
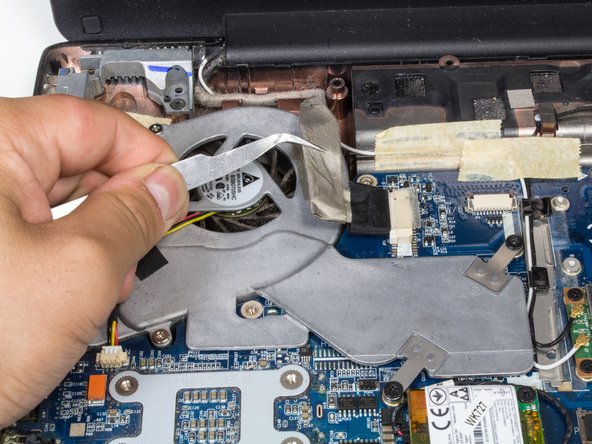
Pull away gray flat cable from the fan so that it is no longer stuck to the fan's surface.Disconnect cable by pulling the black end to the left so that it detaches from the white plastic piece.Disconnect cable by pulling the black end to the left so that it detaches from the white plastic piece.

مرحله 27

  • با استفاده از موچین، کابل برق را با کشیدن انتهای سفید آن از سوکت خود، قطع کنید.

Using tweezers, disconnect power cable by gently pulling white end straight away from its socket.Using tweezers, disconnect power cable by gently pulling white end straight away from its socket.

مرحله 28 تعویض فن

  • فن را برای تعویض یا نظافت از لپ تاپ بلند کنید.

هرگونه گرد و غبار را بیرون بکشید یا از یک گرد و غبار هوای تحت فشار برای تمیز کردن فن استفاده کنید.

Lift fan up out of laptop.Pull out any dust or use a pressurized air duster to clean the fan.

از مقالات مرتبط با لپ تاپ توشیبا: تعویض باتری Satellite P55t-A5116 توشیبا

پاسخ دهید

نشانی ایمیل شما منتشر نخواهد شد. بخش‌های موردنیاز علامت‌گذاری شده‌اند *