اردیبهشت 5, 1403 2:22 ب.ظ

ایران سرویس

خیابان بهبودی، نرسیده به نصرت، جنب بانک سپه، پلاک 145،ساختمان بنیامین،طبقه 5 واحد 18
دفتر مرکزی: 66097851  مرکز تعمیرات: 66097859  شعبه شرق: 77978135  شعبه هفت تیر: 88836102  شعبه جنوب: 55300568   شعبه غرب: 44153186   شعبه شمال 26721443   شعبه اسلامشهر و رباط کریم: 56746602

 تعویض مادربرد Envy 7640 اچ پی
تعویض مادربرد Envy 7640 اچ پی

مرحله 1 تعویض مادربرد – رولر کاغذ

  • دکمه های پلاستیکی واقع در اطراف پرینتر را روبه بالا فشار داده تا پرینتر باز شود.
  • کمک دهانه را از ستون خود با فشار آن به سمت جلوی پرینتر با استفاده از اسپادگر نایلونی بردارید.
  • گیره فنری متصل به بالای پرینتر را با فشار دادن آن به بیرون از قلاب بردارید.

Open the printer by pushing upwards on the plastic tabs located on the sides of the printer.Remove the opening assist from its purchase by pushing it toward the front of the printer with a nylon spudger.Remove the spring-loaded  clip attached to the top of the printer by pushing it off of the hook.

مرحله 2

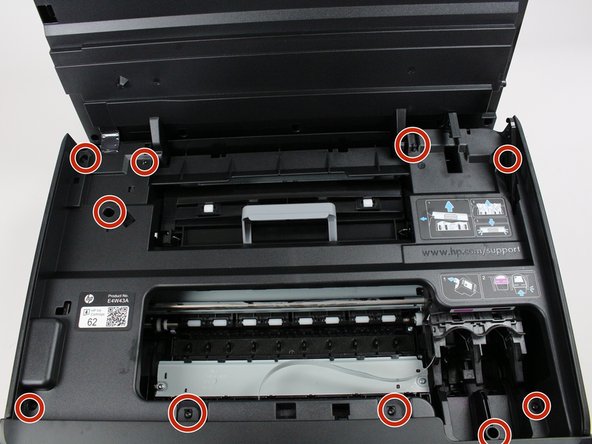
  • پیچ گوشتی تروکس 9 را در شیار پیچ قرار داده و خلاف عقربه های ساعت چرخانده تا 10 پیچ 12 میلیمتری باز شوند.
  • پیچ گوشتی تروکس 9 را در شیار پیچ قرار داده و خلاف عقربه های ساعت چرخانده تا 2 پیچ 12 میلیمتری باز شوند، صفحه نمایشگر می توان اکنون با فشار دادن آن به بیرون و راست از پرینتر جدا شود.
  • فریم پلاستیکی داخلی را با گرفتن فریم با دو دست و کشیدن فریم از بدنه پرینتر بردارید. (این قطعه پس از برداشتن 10 پیچ 12میلیمتری قابل جابجایی است).

Remove the last ten 12mm screws by placing the Torx 9 screwdriver in the screw slot and turning counterclockwise.Remove the last two 12mm screws by placing the Torx 9 screwdriver in the screw slot and turning counterclockwise;  the screen plate can now be separated from the printer by pushing out and to the right.

مرحله 3

  • اهرم خاکستری کاور پلاستیکی مشکی رولرها را گرفته و اهرم را به آرامی به بالا و راست بکشید.

Grasp the gray lever of the black plastic cover of the rollers and gently pull the lever up and to the right.Grasp the gray lever of the black plastic cover of the rollers and gently pull the lever up and to the right.

مرحله 4

  • اهرم را به بیرون فشار داده و با یک دست از رولر کاغذ دور کنید.
  • رولر کاغذ را با یک دست به بالا و بیرون از پرینتر اچ پی بکشید و اهرم را فشار داده تا از رولر کاغذ خارج شود.
بخوانید  تعویض هارد دیسک 15-af013cl اچ پی

Press the lever outwards and away from the paper rollers with one hand.Pull the paper rollers up and out of your HP printer with one hand while the other continues to depress the lever away from the paper rollers.Pull the paper rollers up and out of your HP printer with one hand while the other continues to depress the lever away from the paper rollers.

مرحله 5- مادربرد

  • پنل های طرفین را از پرینتر بیرون کشیده و آنها را بردارید.

Pull the side panels up and away from the printer to remove them.Pull the side panels up and away from the printer to remove them.

مرحله 6

  • تمامی کابل ها را از پایه خود در مسیر اصلی قطع کنید (کانکتورهای بالا را به بالا کشیده و کانکتورهای پایین را به پایین بکشید).

Detach all the cables by gently pulling on them at their base in the direction of origin (for top connectors pull up and for bottom connectors pull down).Detach all the cables by gently pulling on them at their base in the direction of origin (for top connectors pull up and for bottom connectors pull down).Detach all the cables by gently pulling on them at their base in the direction of origin (for top connectors pull up and for bottom connectors pull down).

مرحله 7

  • دو کانکتور واقع در بالای مادربرد را با گرفتن قسمت برنزه ای مجاور مادربرد روبه بالا بکشید و سپس آنها را بردارید.

Remove the last two connectors found at the top of the motherboard by grasping the tan portion adjacent to the motherboard and pulling up.

مرحله 8

  • پیچ گوشتی تروکس 9 را در شیار پیچ قرار داده و خلاف عقربه های ساعت چرخانده تا 4 پیچ 7 میلیمتری باز شوند.

Remove the four 7 mm screws from the motherboard by placing the Torx 9 screwdriver in the screw slots and turning counterclockwise.

مرحله 9

  • ابتدا سمت چپ مادربرد را با نیروی کم از روکش پرینتر بلند نموده و سپس مادربرد را از دستگاه بردارید.
  • سر گیره ها را از مادربرد دور کنید تا سمت راست مادربرد از روکش پرینتر آزاد شود.
  • قسمت برنزه ای کانکتور مجاور مادربرد را گرفته و آن را به سمت پرینتر بکشید تا مادربرد جابجا شود و سپس کانکتور مشکی را بردارید.

Start to remove the motherboard from the device by lifting the left hand side of the motherboard out from the printer shell with minimal force.Push the clip's head away from the motherboard to release the right hand side of the motherboard from the printer shell.Remove the back connector by firmly grasping the tan portion of the connector adjacent to the motherboard and pulling in toward the printer to dislodge the motherboard.

مرتبط: تعویض هد چاپ Envy 7640 اچ پی

نمایندگی HP در کرج

پاسخ دهید

نشانی ایمیل شما منتشر نخواهد شد. بخش‌های موردنیاز علامت‌گذاری شده‌اند *