اردیبهشت 4, 1403 9:55 ب.ظ

ایران سرویس

خیابان بهبودی، نرسیده به نصرت، جنب بانک سپه، پلاک 145،ساختمان بنیامین،طبقه 5 واحد 18
دفتر مرکزی: 66097851  مرکز تعمیرات: 66097859  شعبه شرق: 77978135  شعبه هفت تیر: 88836102  شعبه جنوب: 55300568   شعبه غرب: 44153186   شعبه شمال 26721443   شعبه اسلامشهر و رباط کریم: 56746602

 پیاده سازی اسپیکر NDZ-03-GB) Mi) شیائومی
پیاده سازی اسپیکر NDZ-03-GB) Mi) شیائومی

مرحله 1 پیاده سازی اسپیکر

  • به نظر می رسد این دستگاه منظم است و هیچ چیز فوق العاده دیگری نمی باشد.
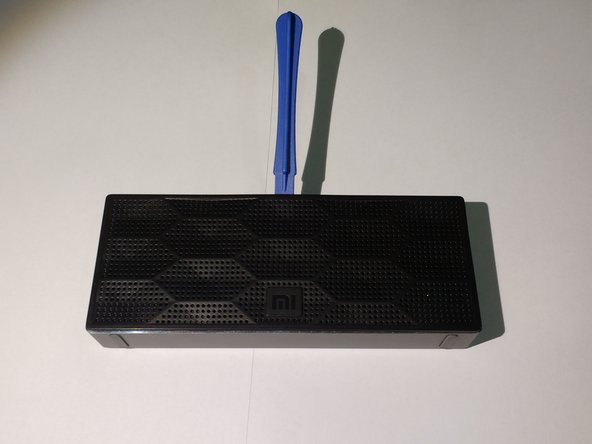
So that's the device, looks neat, nothing too special. Let's get right to it!

مرحله 2

  • قطعه جلو را با ابزار بازکننده بلند کنید. پیشنهاد می شود تا از قسمت بالا و سپس از اطراف شروع کنید.

Take an opening tool and pry off the front piece. I suggest starting at the top and then just go round the whole thing till it pops off.Take an opening tool and pry off the front piece. I suggest starting at the top and then just go round the whole thing till it pops off.

مرحله 3

  • اکنون 8 پیچ باید برداشته شوند.

Now you must undo the eight screws

مرحله 4

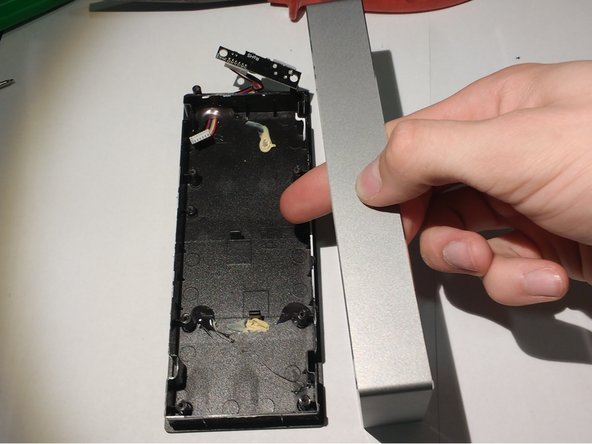
  • دیگر قطعه جلو باید با یک نوع ابزار بلند شود.

هیچ ابزاری جز ابزار پلاستیک سخت وجود ندارد.

پیشنهاد می شود از قسمت راست شروع کنید.

نکته: چسب به این قطعه متصل است بنابراین برای خارج کردن آن از بدنه اصلی باید نیروی کافی اعمال شود.

همچنین این قطعه با کابل های بسیار نازکی به برد منطقی متصل شده است بنابراین آنها را نباید از هم جدا کرد.
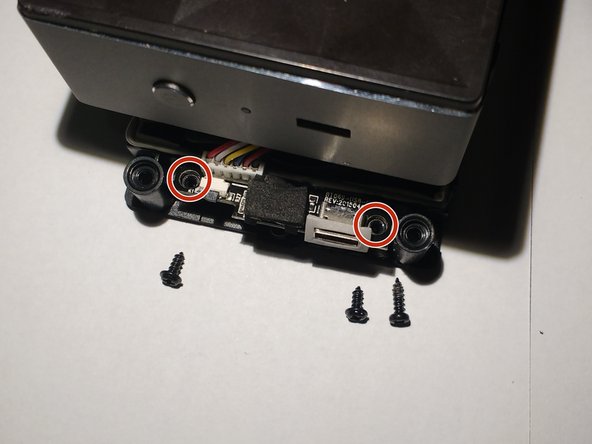
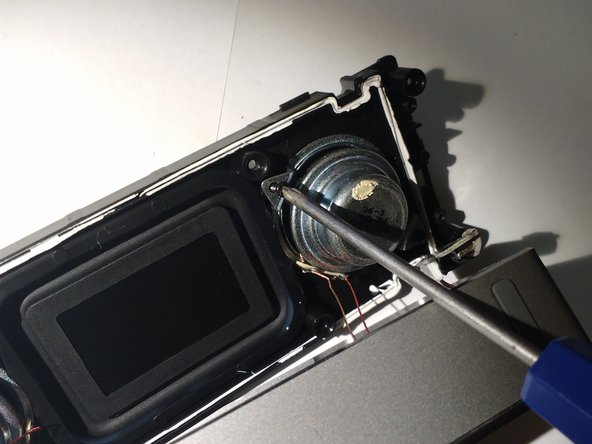
Now you have to remove this other front piece by prying it off with some kind of tool. I didn't have anything better and simply used some kind of hard plastic I found in my drawer. I suggest starting on the right side, since it's pretty much the only spot where you can start.NOTE: It's attached with adhesive so you'll have to use a bit of force to get it off the main body. And also this piece is attached by a couple of very thin cables to the logic board so don't tear them apart.

مرحله 5

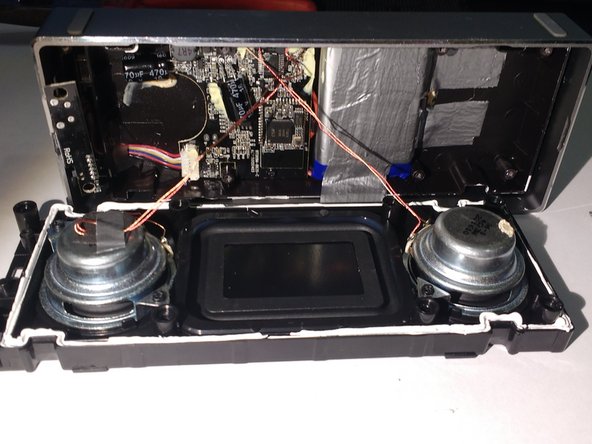
  • کانکتور مشخص شده در تصویر را خارج نکنید. این مرحله ضروری نمی باشد.
  • اسپیکر را از قسمت جلو قرار داده و دو پیچ را برداشته تا برد منطقی با پورت USB، دکمه on/off و LED کوچک برداشته شود.
  • پیچ بزرگتر فقط برای مقیاس وجود دارد. هنگام مونتاژ دستگاه باید دقت کرد که از پیچ های اشتباه استفاده نشود.
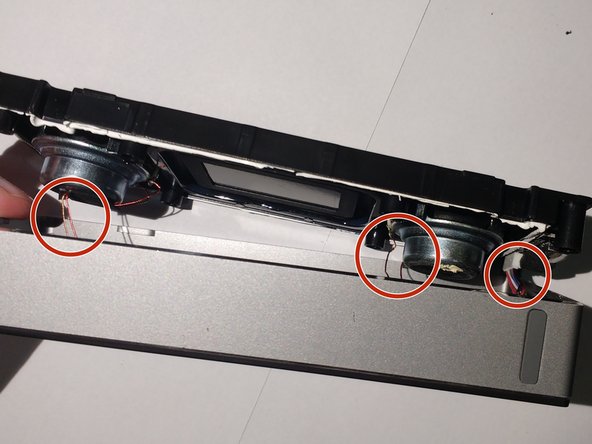
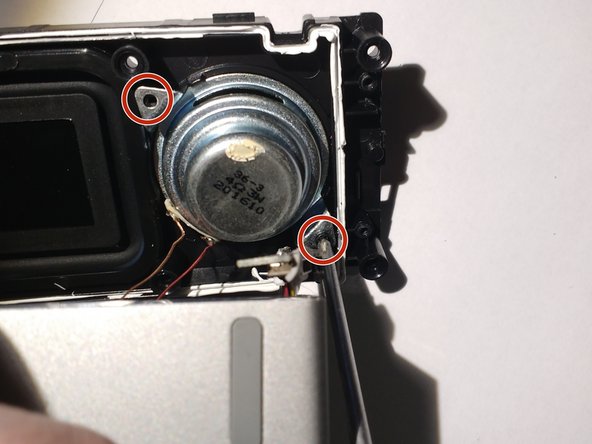
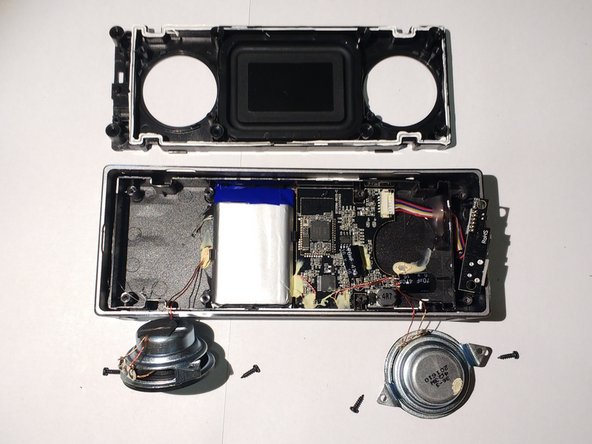
Don't try to take off that marked connector. That's an unnecessary step.Instead put the speaker with the front faced down and undo two screws to get off the smaller logic board with the usb-port, the on/off button and the small LED.

مرحله 6

  • پس از برداشتن برد منطقی کوچکتر، دسترسی به سایر قطعات دستگاه راحتر خواهد بود.
  • اکنون 4 پیچ را از هر دو اسپیکر بردارید. هر دو طرف شبیه هم هستند. پس از برداشتن این دو پیچ، فریم جلو را می توانید بردارید.
  • در این نقطه، باتری را می توان با نوار چسب یا چسب دیگری تعمیر کرد.
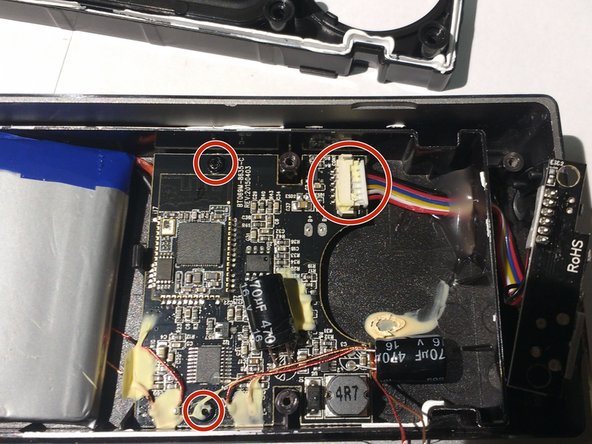
بخوانید  تعویض مادربرد نوت Redmi شیائومی

After you've removed that smaller logic board you'll be able to be more agile with your device.Now just undo the four screws from both speakers. Both sides are pretty much the same. After removing both, you'll be able to remove the front frame.At this point you are able to fix your loose battery with some duct tape or any other kind of adhesive you like!

مرحله 7

  • مرحله بعدی شامل برداشتن کانکتور و دو پیچ روی برد منطقی اصلی است.
  • باتری را در صورت لزوم می توان با باتری جدید تعویض کرد، تنها مشکل این است که باید در مادربرد لحیم شود.

Next step is the removal of the connector and two more screws on the main logic board.You can also completely exchange the battery if you need a new one, the only problem is that it's soldered to the motherboard.You can also completely exchange the battery if you need a new one, the only problem is that it's soldered to the motherboard.

مرحله 8

  • اگر بعضی از کابل ها به پایه چسبینده بوده و به کابل اضافی نیاز است، چسب را برندارید.

در عوض روی کابل را به آرامی بکشید. این کار آسانتر خواهد بود.

If some cables are glued to the base and you need the extra length of the cable don't try to scrape off the adhesive. Instead just pull gently on the cable. That's much easier!

مرحله 9

  • اگر به هر دلیلی قسمت پشت باید برداشته شود در اینصورت می توانید آن را با انگشت به راحتی بردارید.

If, for some reason, you should also need to remove the back you can simply just pop it out with your fingers.If, for some reason, you should also need to remove the back you can simply just pop it out with your fingers.

مرحله 10

  • هنگام بازگشت به مونتاژ و اینکه نمی دانید کدام اسپیکر در کدام طرف قرار دارد، می توانید یک L و R کوچک را در برد منطق مشاهده کنید که به شما کمک می کند.

و همچنین می توانید مشاهد کنید که چگونه lol باتری وصل می شود.

قبل از محکم کردن برد منطقی صفحه به پشت، پیشنهاد می شود تا باتری را به پیاه از تمام جهات ضربه زده تا مطمئن شوید که واقعا ثابت است.

When going back to the assembly and you don't know which speaker was on which side, you can see a small L and R on the logic board that'll help you!And that is pretty much it! You can also see how I attached the battery lol. Before screwing the main logic board back to the back I'd suggest taping the Battery to the base from all sides to ensure that it is actually stable now.And that is pretty much it! You can also see how I attached the battery lol. Before screwing the main logic board back to the back I'd suggest taping the Battery to the base from all sides to ensure that it is actually stable now.

مرتبط با شیائومی: تعویض مادربرد نوت Redmi شیائومی

نمایندگی شیائومی در تهران

پاسخ دهید

نشانی ایمیل شما منتشر نخواهد شد. بخش‌های موردنیاز علامت‌گذاری شده‌اند *